Nginx Library

A repository of Nginx-related articles

Wordpress permalinks

Wordpress generally works out-of-the box on nginx. The posts load fine, the functions in the dashboard work pretty well, until you come to the permalinks. If you are on Apache, with mod_rewrite, Wordpress will automatically add the required rewrite rules to your .htaccess file for permalinks to work. But for nginx, you have to add the rules manually.

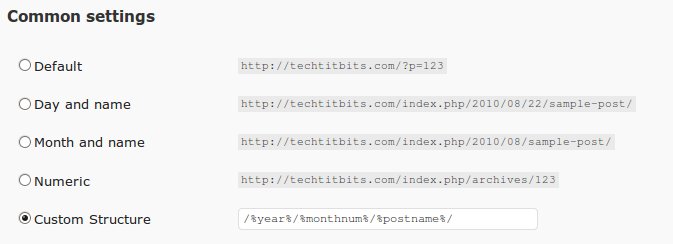
Moreover, when WordPress detects that mod_rewrite is not loaded (which is the case with nginx), it falls back to using PATHINFO permalinks, which inserts an extra ‘index.php’ in front. This hasn’t been much of a problem for me as I have been using the custom structure option to remove the index.php. It has been working fine for me. (Screenshot below)

2

Apart from that, you will also need to edit your nginx configuration file to make the permalinks work. We will use the try_files directive (available from nginx 0.7.27+) to pass URLs to Wordpress’s index.php for them to be internally handled. This will also work for 404 requests.

If your blog is at the root of the domain (something like http://www.myblog.com), find the location / block inside the configuration file, and add the following line to it.

try_files $uri $uri/ /index.php?$args;

Here, Nginx checks for the existence of a file at the URL ($uri), then for a directory ($uri/). If it doesn’t find a directory or a file, it performs an internal redirect to /index.php passing the query string arguments as parameters.

It should look like this after the edits :

location / {
    index index.php index.html index.htm;
    try_files $uri $uri/ /index.php?$args;
}

If your blog is in a subfolder (say /blog), you’ll have to add an extra location /blog/ block to your configuration file :

location /blog/ {
    try_files $uri $uri/ /blog/index.php?$args;
}

After you have finished making the changes in the configuration file, reload the nginx configuration by :

nginx -s reload

Wordpress’ pretty permalinks should work fine now.

Enable IPv6 support

To enable IPv6 support in nginx, we need to check whether it has been compiled with --with-ipv6 flag. To check, fire up the terminal and type in this command :

nginx -V

The results should be something like this :

nginx version: nginx/0.7.65
TLS SNI support enabled
configure arguments: --conf-path=/etc/nginx/nginx.conf --error-log-path=/var/log/nginx/error.log --pid-path=/var/run/nginx.pid --lock-path=/var/lock/nginx.lock --http-log-path=/var/log/nginx/access.log --http-client-body-temp-path=/var/lib/nginx/body --http-proxy-temp-path=/var/lib/nginx/proxy --http-fastcgi-temp-path=/var/lib/nginx/fastcgi--with-debug --with-http_stub_status_module --with-http_flv_module --with-http_ssl_module --with-http_dav_module --with-http_gzip_static_module --with-http_realip_module --with-mail --with-mail_ssl_module --with-ipv6 --add-module=/build/buildd/nginx-0.7.65/modules/nginx-upstream-fair

Pre-compiled Debian/Ubuntu packages already has IPv6 support built-in.

Now we need to edit the configuration file to tell nginx to bind to IPv6 addresses(as well as IPv4 addresses).

sudo nano /etc/nginx/sites-available/default

Depending on your configuration, this file might be located somewhere else. (Check /usr/local/nginx/conf/nginx.conf if you compiled nginx manually)

Search for listen directives and change them as follows:

listen [::]:80;

This will make nginx bind to both IPv6 and IPv4 addresses.

In order to bind to IPv6 addresses only (no IPv4), use the following:

listen [::]:80 default ipv6only=on;

In order to bind to a specific IPv6 address:

listen [2001:470:0:76::2]:80;

When you are done, reload the nginx configuration file by typing in :

nginx -s reload

Now we have to check whether nginx is listening to both IPv6 and IPv4 requests:

netstat -tulpna | grep nginx

You’ll get something like this :

tcp6 0 0 :::80 :::* LISTEN 1891/nginx

You have successfully configured nginx to respond to IPv6 requests.

Www/no-www rewrite rules

There are many ways to rewrite www urls to their non-www versions in nginx. Here one that’s Igor-approved and works well on my setup :

WWW to Non-WWW:

#301 redirect www to non-www
server {
    listen   [::]:80;
    server_name  www.domain.com;
    rewrite ^    http://domain.com$request_uri? permanent;
}

server {
    listen   [::]:80;
    server_name  domain.com;
    .........................................
    .........................................
}

Non-WWW to WWW:

#301 redirect non-www to www
server {
    listen   [::]:80;
    server_name  domain.com;
    rewrite ^    http://www.domain.com$request_uri? permanent;
}

server {
    listen   [::]:80;
    server_name  www.domain.com;
    .........................................
    .........................................
}

Resolving “No input file specified” error

If you are using nginx with php-cgi and have followed the standard procedure to set it up, you might often get the “No input file specified” error. This error basically occurs when the php-cgi daemon cannot find a .php file to execute using the SCRIPT_FILENAME parameter that was supplied to it. I’ll discuss about the common causes of the error and it’s solutions.

Wrong path is sent to the php-cgi daemon

More often than not, a wrong path (SCRIPT_FILENAME) is sent to the fastCGI daemon. In many of the cases, this is due to a misconfiguration. Some of the setups I have seen are configured like this :

server {
    listen   [::]:80;
    server_name  example.com www.example.com;
    access_log  /var/www/logs/example.com.access.log;  

    location / {
        root   /var/www/example.com;
        index  index.html index.htm index.pl;
    }

    location /images {
        autoindex on;
    }

    location ~ \.php$ {
        fastcgi_pass   127.0.0.1:9000;
        fastcgi_index  index.php;
        fastcgi_param  SCRIPT_FILENAME  /var/www/example.com$fastcgi_script_name;
        include fastcgi_params;
    }
}

Now, there are many things wrong with this configuration. An obvious and glaring issue is the root directive in the location / block. When the root is defined inside the location block, it is available/defined for that block only. Here, the location /images block will not match for any request because it does not have any $document _root defined and we will have to redundantly define root again for it. Obviously, the root directive should be moved out of the location / block and defined in the server block. This way, the location blocks will inherit the value defined in the parental server block. Of course, if you want to define a different $document_root for a location, you can put a root directive in a location block.

Another issue is that the value of the fastCGI parameter SCRIPT_FILENAME is hard-coded. If we change the value of the root directive and move our files somewhere else in the directory chain, php-cgi will return a “No input file specified” error because will not be able to find the file in the hard-coded location which didn’t change when the $document_root was changed. So, we should set SCRIPT_FILENAME as below :

fastcgi_param  SCRIPT_FILENAME  $document_root$fastcgi_script_name;

We should keep in mind that the root directive should be in the server block or else, only the $fastcgi_script_name will get passed as the SCRIPT_FILENAME and we will get the “No input file specified” error.

The file actually does not exist

What happens here is that, even when Nginx receives the request to serve a non-existent file with a .php extension, it passes the request to php-cgi. This happens because Nginx does not check for the file, it only checks if the REQUEST_URI ends with a .php. Php-cgi, while trying to processs the request, finds that the php file does not exist at all. Hence it sends a “No input file specified” message with a “404 Not Found” header.

We can intercept the request for the non-existent php file and show a 404 page.

First, find out the version of nginx you are using.

nginx -v

You’ll get an output like this :

nginx version: nginx/0.7.67

If php-cgi is running on port 9000, you’ll have something like this in your vhosts file :

location ~ .php$ {
    fastcgi_pass   127.0.0.1:9000;
    fastcgi_index  index.php;
    fastcgi_param  SCRIPT_FILENAME ....
    ...................................
    ...................................
}

Since nginx versions less than 0.6.36 doesn’t have the try_files directive, we’ll have two versions of the code.

For nginx 0.6.36+

We’ll use try_files here to catch non-existent URLs and display an error page.

location ~ .php$ {
    try_files  $uri =404;
    fastcgi_pass   127.0.0.1:9000;
    fastcgi_index  index.php;
    fastcgi_param  SCRIPT_FILENAME ....
    ...................................
    ...................................
}

Here we are checking for the existence of the .php file before passing it to the fastCGI backend. If the file does not exist, we return a 404 Not Found page.

For older versions :

location ~ .php$ {
    fastcgi_intercept_errors on;
    error_page  404  /path/to/404.htm;
    fastcgi_pass   127.0.0.1:9000;
    fastcgi_index  index.php;
    fastcgi_param  SCRIPT_FILENAME ....
    ...................................
    ...................................
}

Here the fastcgi_intercept_errors asks the fastCGI backend to return error statuses to Nginx so that Nginx can respond with a custm 404 page. The error_page directive defines a custom 404 page. Note that this will work for both older and newer versions of Nginx, but personally I think the try_catch method is cleaner.

Permissions are not set correctly

Permissions are not supposed to be much of a headache for executing PHP files. Apparently, we only need to make sure that the user the fastCGI backend is running as, has read permissions for the file. But it is often overlooked that a user also needs execute permissions for every parent directory of a file to chdir to that file. For example, say a file is located at -

/home/steve/files/req.txt

The user needs to have read permissions for the file as well as execute permissions for /, /home, /home/steve and /home/steve/files.

I have covered most of the common issues that cause this error. If you have something else, feel free to leave a comment.
Welcome to Nginx Library

Welcome to Nginx Library, where over time, I’ll be posting various guides and how-tos to use and optimize the powerful, but lightweight web server, Nginx.